A foot diagram reflexology chart is a useful visual guide for understanding the areas of the feet commonly associated with different parts of the body in reflexology. By looking at a reflexology foot chart, beginners can more easily identify areas to massage and understand how practitioners organize the foot into different reflex zones.
Reflexology is a complementary wellness practice that involves applying pressure to specific areas of the feet, hands, or ears. A foot reflexology diagram is often used as a reference during a session because it provides a simple visual map of commonly recognized reflex points.
Whether you are learning reflexology for personal relaxation or simply want to understand how reflexology charts work, a clear foot diagram can make the subject much easier to explore.
What Is a Foot Diagram Reflexology Chart?
A foot diagram reflexology chart is a visual representation of the feet divided into different reflex zones. Each zone is traditionally associated with a particular body area, organ, or body system.
Reflexology practitioners use these diagrams as reference tools when deciding where to apply gentle pressure. The charts can vary in appearance and level of detail, but most show the soles of the feet with labels identifying commonly referenced areas such as the head, sinuses, lungs, stomach, liver, kidneys, intestines, and spine.
It is important to understand that these associations come from reflexology traditions. They should not be interpreted as anatomical connections or as proof that stimulating a particular point can diagnose or treat a medical condition.
How to Read a Reflexology Foot Chart
Reading a reflexology foot chart is relatively straightforward once you understand its basic layout. Most charts display both feet because the traditional reflexology map assigns different areas to the left and right foot.
Start With the Toes
The toes are commonly associated with the head and neck region in traditional reflexology charts. Different parts of the toes may be labeled for areas such as the brain, sinuses, eyes, ears, or throat.
Because the toes are small, diagrams often use lines or color-coded sections to make individual reflex areas easier to identify.
Move to the Ball of the Foot
The area beneath the toes, commonly called the ball of the foot, is generally associated with the upper torso in reflexology charts. Depending on the chart, this region may include areas labeled for the lungs, heart, shoulders, or chest.
Examine the Arch
The arch contains many of the areas shown on a typical foot reflexology chart. Traditional diagrams commonly associate different parts of the arch with digestive and abdominal areas, including the stomach, pancreas, liver, gallbladder, kidneys, and intestines.
Check the Heel and Lower Foot
The heel and lower portion of the foot are commonly associated with the lower body and pelvic region. Depending on the specific reflexology system being used, charts may include areas such as the bladder, sciatic nerve, colon, or reproductive organs.
Common Reflexology Foot Zones
Although reflexology charts differ slightly, several body areas appear frequently across traditional foot maps.
- Toes: Commonly associated with the head, brain, sinuses, eyes, ears, and neck.
- Upper foot: Often associated with the chest, shoulders, lungs, and upper body.
- Upper arch: Commonly mapped to digestive and abdominal areas.
- Middle arch: Often includes traditional reflex areas associated with the kidneys, pancreas, and intestines.
- Lower arch: May include areas associated with the lower abdomen and pelvic region.
- Heel: Traditionally connected with lower-body and pelvic areas on many reflexology charts.
These associations are useful for understanding how a reflexology map is organized, but they should not be confused with medically established anatomical pathways.
Left Foot vs. Right Foot Reflexology Chart
One of the most noticeable features of a foot reflexology diagram is the distinction between the left and right feet. Traditional reflexology maps do not necessarily show identical zones on both sides.
Some areas are shown on both feet, while others are traditionally associated more strongly with one side. For example, many reflexology charts distinguish between organs that are predominantly located on the left or right side of the body.
This is why it is helpful to use a diagram that clearly labels left foot and right foot rather than relying on a generic illustration.
How to Use a Foot Reflexology Diagram
A reflexology chart can be used as a basic reference when practicing gentle foot massage. You do not need complicated equipment to begin exploring the technique.
1. Find a Comfortable Position
Sit in a comfortable position where you can easily reach the sole of the foot. Supporting the ankle with a cushion can make the process more comfortable.
2. Warm Up the Foot
Before focusing on specific reflex areas, gently massage the entire foot. Light rubbing can help you become familiar with the shape and sensitivity of the foot.
3. Locate the Area on the Chart
Use the foot diagram to identify the reflex zone you want to explore. Compare the location on the chart with the corresponding area on your foot.
4. Apply Gentle Pressure
Use your thumb or fingertips to apply comfortable, steady pressure. There is no need to press aggressively. A gentle technique is generally more appropriate for relaxation-focused foot massage.
5. Pay Attention to Comfort
If an area feels unusually painful, stop or reduce the pressure. A reflexology session should not require you to tolerate severe or sharp pain.
Benefits Commonly Associated With Reflexology
Reflexology is generally used as a complementary wellness practice rather than a replacement for medical treatment. People may choose foot reflexology as part of a relaxation routine or massage practice.
Potential wellness goals may include:
- Promoting relaxation
- Supporting a calming self-care routine
- Reducing everyday tension
- Encouraging awareness of the feet and body
- Providing a soothing massage experience
- Creating time for rest and mindfulness
The experience can vary from person to person. Reflexology should therefore be viewed as a complementary practice rather than a guaranteed treatment for a particular disease or medical condition.
Foot Reflexology Massage Tips for Beginners
If you are new to reflexology, keeping the technique simple is usually the easiest approach.
- Start gently: Use moderate pressure rather than pressing as hard as possible.
- Work gradually: Begin with a general foot massage before focusing on individual zones.
- Use a reflexology chart: Keep a clear diagram nearby as a visual reference.
- Keep sessions comfortable: Stop if you experience significant pain or discomfort.
- Stay consistent: If you enjoy reflexology as a relaxation activity, incorporate it into a regular self-care routine.
- Keep expectations realistic: A reflexology diagram is a wellness reference, not a medical diagnostic tool.
Is a Foot Reflexology Chart a Medical Diagram?
No. A traditional reflexology chart should not be treated as a medical anatomy chart. The zones shown on reflexology maps represent traditional reflexology concepts rather than medically established one-to-one connections between areas of the feet and internal organs.
For this reason, a foot diagram reflexology chart is best used to understand the structure of reflexology practices and as a guide for relaxation-oriented foot massage.
If you have persistent pain, swelling, numbness, an unexplained change in your feet, or symptoms affecting another part of your body, consult an appropriate healthcare professional rather than relying on a reflexology chart.
Who May Want to Use a Reflexology Foot Diagram?
A printable foot reflexology diagram can be useful for several audiences. Beginners can use it to learn the basic organization of reflex zones, while massage and reflexology students may use a chart as a study reference.
It can also be helpful for anyone interested in creating a simple home wellness routine. A printable chart makes it easy to keep the major zones visible while learning where different areas are traditionally located.
Printable Foot Diagram Reflexology Reference
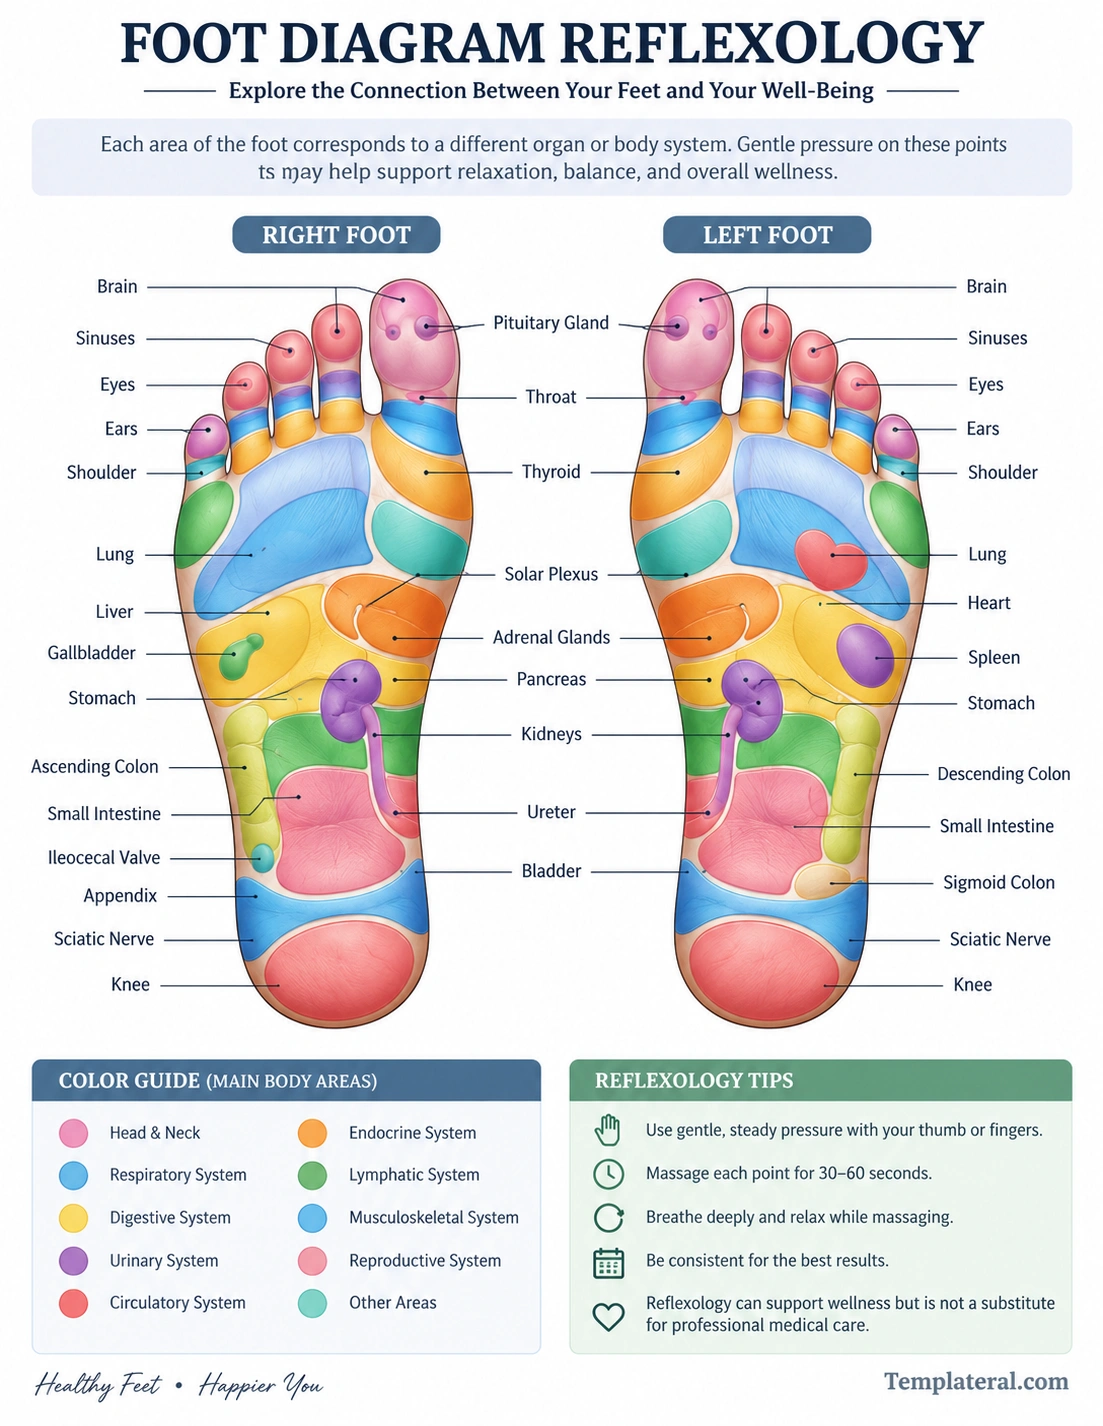
A printable foot diagram reflexology worksheet can be especially convenient because you can keep it beside your chair, massage table, notebook, or study materials. A clear chart should ideally show both feet, use readable labels, and separate different zones visually.
The diagram above is designed as a straightforward visual reference, with the left and right feet displayed side by side. The color-coded sections make it easier to distinguish major reflexology areas while the labels provide quick reference points.
For personal use, you can print the chart and mark areas that you want to remember or study. If you are learning reflexology terminology, you can also use the diagram as a simple study worksheet.
Final Thoughts
A foot diagram reflexology chart provides a simple way to understand the traditional organization of reflexology foot zones. By separating the feet into areas associated with different parts of the body, the chart makes it easier for beginners to explore the basic concepts of reflexology.
Whether you are studying reflexology, practicing gentle foot massage, or simply looking for a printable wellness reference, a clear foot reflexology chart can be a useful tool. Remember, however, that reflexology is a complementary practice and that its traditional zone associations should not be used to diagnose or treat medical conditions.
Use the chart as a visual learning and relaxation aid, keep pressure comfortable, and seek professional medical advice whenever you have concerning or persistent symptoms.
Download: Foot Diagram Reflexology Template
