A reflex chart is a visual reference that maps commonly identified reflexology points on the feet to different areas of the body. It is often used as a learning aid by people interested in foot reflexology, wellness routines, massage techniques, or basic anatomy references.
A clear chart makes it easier to locate different areas of the foot and understand how traditional reflexology systems organize them. A printable version can be especially convenient because it can be kept beside a massage table, stored in a wellness binder, or used as a quick reference during a personal foot massage routine.
It is important to understand that reflexology is a complementary wellness practice. Reflexology maps are based on traditional reflexology systems, and the claimed connections between foot points and internal organs have not been established as anatomical pathways by modern medical science. A reflexology chart should therefore be used as a reference for the practice rather than as a diagnostic tool.
What Is a Reflex Chart?
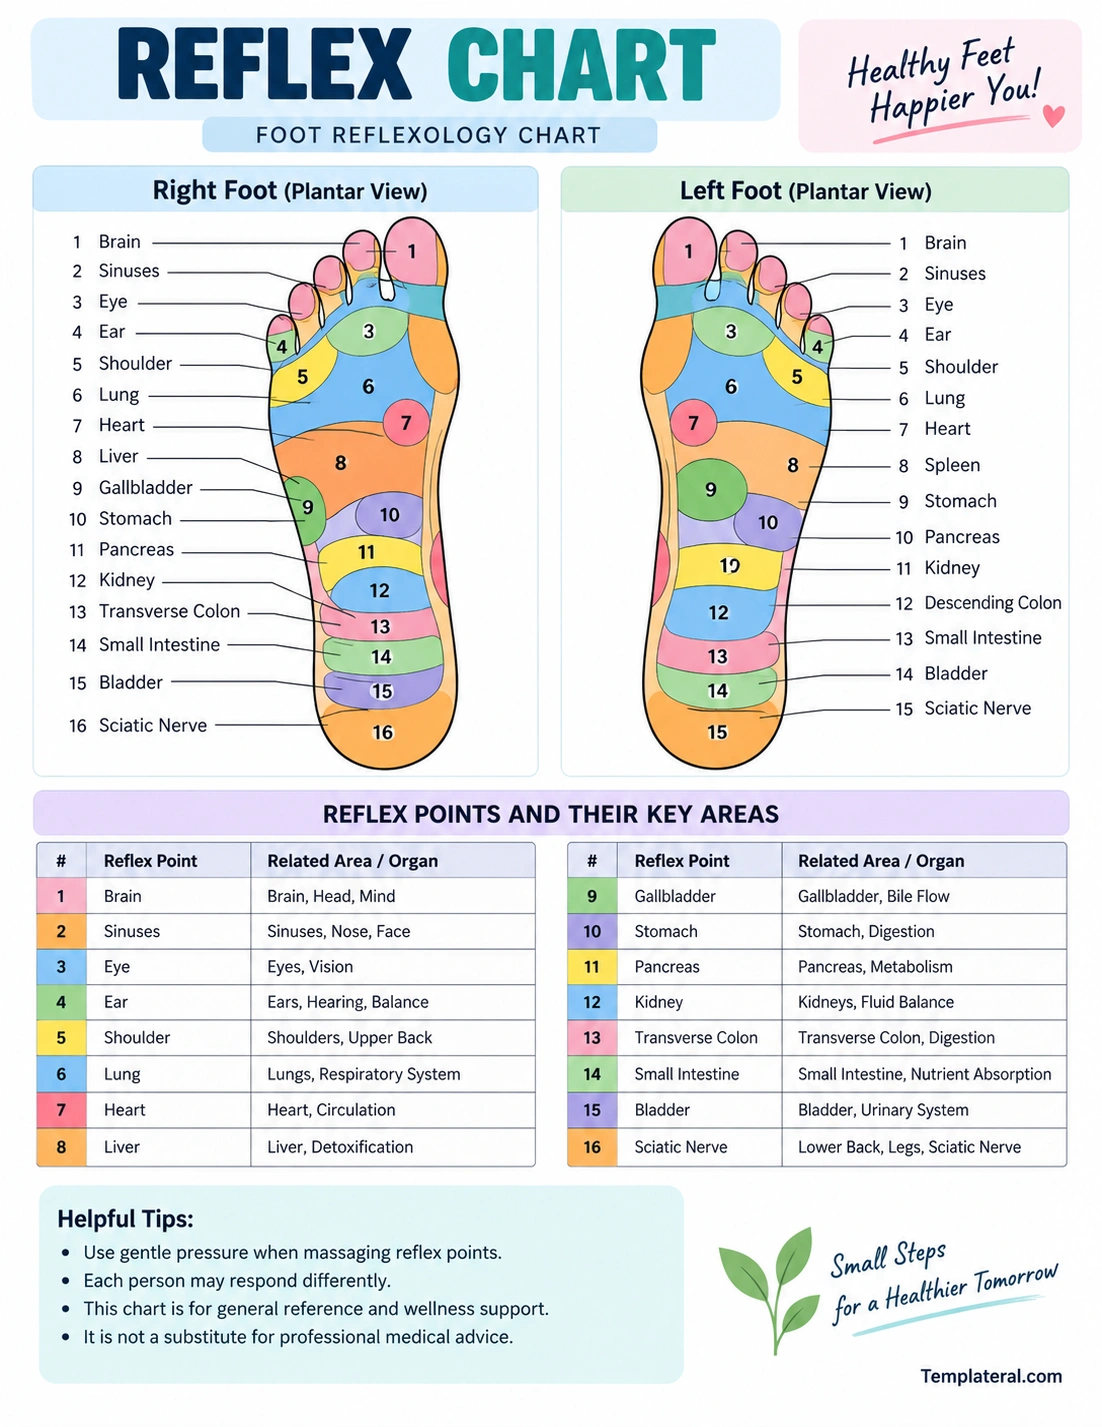
A reflex chart is a diagram that organizes reflexology points into identifiable areas, usually on the soles of the feet. Different charts can vary in their terminology, layout, number of zones, and interpretation of specific points.
Most foot reflexology charts divide the feet into several sections. These may include areas associated traditionally with the head, sinuses, chest, abdomen, digestive system, and lower body.
The purpose of the chart is primarily to provide a visual reference. Instead of trying to remember the location of every point, users can look at the diagram and identify the area they want to work with.
How a Foot Reflex Chart Is Organized
A typical foot reflexology chart uses labels, colors, lines, and numbered zones to make the information easier to follow. Some charts show both feet side by side because traditional reflexology systems may assign different areas to the left and right foot.
Left and Right Foot
Many reflexology diagrams provide separate illustrations for the left and right foot. This helps users identify which foot contains a particular mapped zone.
The two feet may not be represented as identical. Certain traditional reflexology maps associate specific body areas with one foot or the other, so checking the correct side of the chart is important.
Numbered Reflex Points
Numbering can make a reflex chart easier to use. Instead of placing long descriptions directly over the foot illustration, a chart can use numbers and a corresponding reference table.
Color-Coded Zones
Colors are often used to distinguish different regions. A color-coded design can make a detailed foot diagram easier to scan, especially when several zones are located close together.
Common Areas Shown on a Reflexology Chart
Although charts differ, many include areas traditionally associated with several broad regions of the body.
- Head and brain: Commonly mapped around the toes.
- Sinuses: Often represented around the toe and upper-foot region.
- Shoulders: Commonly shown in the upper portion of the foot.
- Chest and lungs: Traditionally mapped across part of the upper sole.
- Abdominal organs: Often represented across the middle portion of the foot.
- Digestive system: Frequently represented around the central and lower sections.
- Bladder: Often included toward the lower arch area.
- Lower back and legs: Commonly represented toward the heel and lower foot.
The exact placement of these areas can vary between reflexology charts, so a particular diagram should be interpreted according to its own labeling system rather than assuming that every chart uses exactly the same map.
How to Use a Reflex Chart
A reflexology chart can be used as a reference when learning basic foot massage or studying the traditional organization of reflexology zones.
1. Identify the Area
Start by identifying the area of the foot shown on the chart. Check whether the diagram represents the left or right foot and whether it uses a plantar, dorsal, or another view.
2. Find the Labeled Zone
Use the labels, numbers, or colors to locate the reflexology point you want to study. Follow the corresponding line or reference number carefully.
3. Apply Gentle Pressure
If you are using the chart as a guide for a personal foot massage, use gentle pressure and pay attention to how your foot feels. Avoid aggressive pressure, particularly around areas that are painful, swollen, injured, or unusually sensitive.
4. Keep the Chart Nearby
A printed reflex chart can be kept nearby so that you do not have to repeatedly search for the location of a particular zone. This can be particularly useful while learning the basic layout of reflexology maps.
Benefits of Using a Printable Reflex Chart
A printable reflexology chart can be useful for both beginners and experienced practitioners who want a convenient visual reference.
- Quick reference: Locate labeled points without searching through a long guide.
- Easy to study: Use the chart to learn the general organization of reflexology zones.
- Convenient format: Keep a printed copy in a notebook, binder, or wellness area.
- Visual learning: Foot diagrams can make spatial information easier to understand.
- Easy to annotate: Add personal notes or reminders to a printed worksheet.
- Useful for instruction: A clear chart can support introductory reflexology education.
Reflex Chart vs. Foot Anatomy Chart
A reflex chart and a foot anatomy chart serve different purposes. Understanding this distinction is important when using either type of diagram.
A foot anatomy chart generally illustrates actual anatomical structures such as bones, muscles, tendons, ligaments, nerves, and blood vessels. It is designed to describe the physical structure of the foot.
A reflex chart, by contrast, illustrates the zones or points used in reflexology systems. The mapped relationships are part of traditional or complementary practice rather than a standard anatomical representation.
For learning anatomy, use an appropriate anatomical reference. For studying the traditional layout of reflexology, a reflexology chart is the more relevant resource.
Tips for Reading a Reflexology Chart
Detailed charts can initially look complicated. A few simple habits can make them easier to understand.
- Read the title first: Determine whether the chart shows the left foot, right foot, or both.
- Check the viewpoint: Make sure you understand whether the foot is shown from the sole or another angle.
- Follow the legend: If colors or numbers are used, check the corresponding key.
- Focus on one region: Study the foot in sections rather than trying to memorize the entire chart at once.
- Compare both feet: When the chart includes left and right foot diagrams, compare the corresponding zones.
- Use it as a reference: Avoid treating the mapped zones as a substitute for medical diagnosis.
Who Can Use a Reflexology Chart?
A reflex chart can be useful for people who want to learn more about traditional foot reflexology or organize their personal wellness materials.
Beginners
Someone new to reflexology can use a simple chart to become familiar with commonly labeled areas without immediately working through a large amount of written material.
Students
A printable worksheet can serve as a study aid. Students can add notes, highlight zones, or create their own reference system while learning about reflexology.
Wellness Practitioners
Practitioners who incorporate reflexology into complementary wellness services may use visual charts as educational references when discussing the traditional mapping system with clients.
Home Users
A home user can keep a reflexology chart available when practicing a gentle foot massage routine or exploring the basic concepts of reflexology.
Important Safety Considerations
A reflex chart should not be used to diagnose disease or determine the cause of unexplained symptoms. If you have persistent pain, swelling, numbness, an injury, or another concerning symptom, seek advice from an appropriately qualified healthcare professional.
People with certain medical conditions or special circumstances may also need professional guidance before receiving foot massage or reflexology. When in doubt, ask a healthcare professional whether the activity is appropriate for you.
Most importantly, a reflexology chart is a reference tool. It should complement appropriate healthcare rather than replace diagnosis, treatment, medication, or professional medical advice.
How to Make the Most of a Printable Reflex Chart
A printed chart becomes even more useful when it is organized for repeated reference. You can place it in a folder with other wellness worksheets, laminate a copy for durability, or keep a clean version available for study.
You can also use a blank area on the worksheet to record terminology, questions, or personal learning notes. If you are studying multiple reflexology systems, keeping separate notes can help you recognize differences between charts instead of assuming that every map uses identical zones.
Final Thoughts
A reflex chart provides a convenient visual way to explore the traditional zones used in foot reflexology. By combining labeled foot diagrams, colors, numbers, and reference information, a printable chart can make the subject easier to study and use as a general wellness reference.
Whether you are a beginner, student, wellness enthusiast, or practitioner, a clear reflexology chart can help organize information in a practical format. Just remember that reflexology maps represent a complementary practice and should not be treated as an anatomical diagnostic system or a replacement for professional medical care.
Download: Reflex Chart Template
