A commission menu is a simple way for artists, designers, illustrators, and other creative professionals to show clients what they offer, how much each service costs, and what customers can expect when placing an order. Instead of explaining every option individually through messages, a well-organized commission menu puts the essential information in one easy-to-read format.
A good commission menu can include artwork types, prices, turnaround times, available add-ons, payment methods, revision policies, terms of service, and examples of work. It can be shared as an image, PDF, social media post, website page, or printable document.
For artists who regularly accept custom work, creating a clear menu can make the ordering process more efficient. It also helps potential clients understand the available options before they contact the artist.
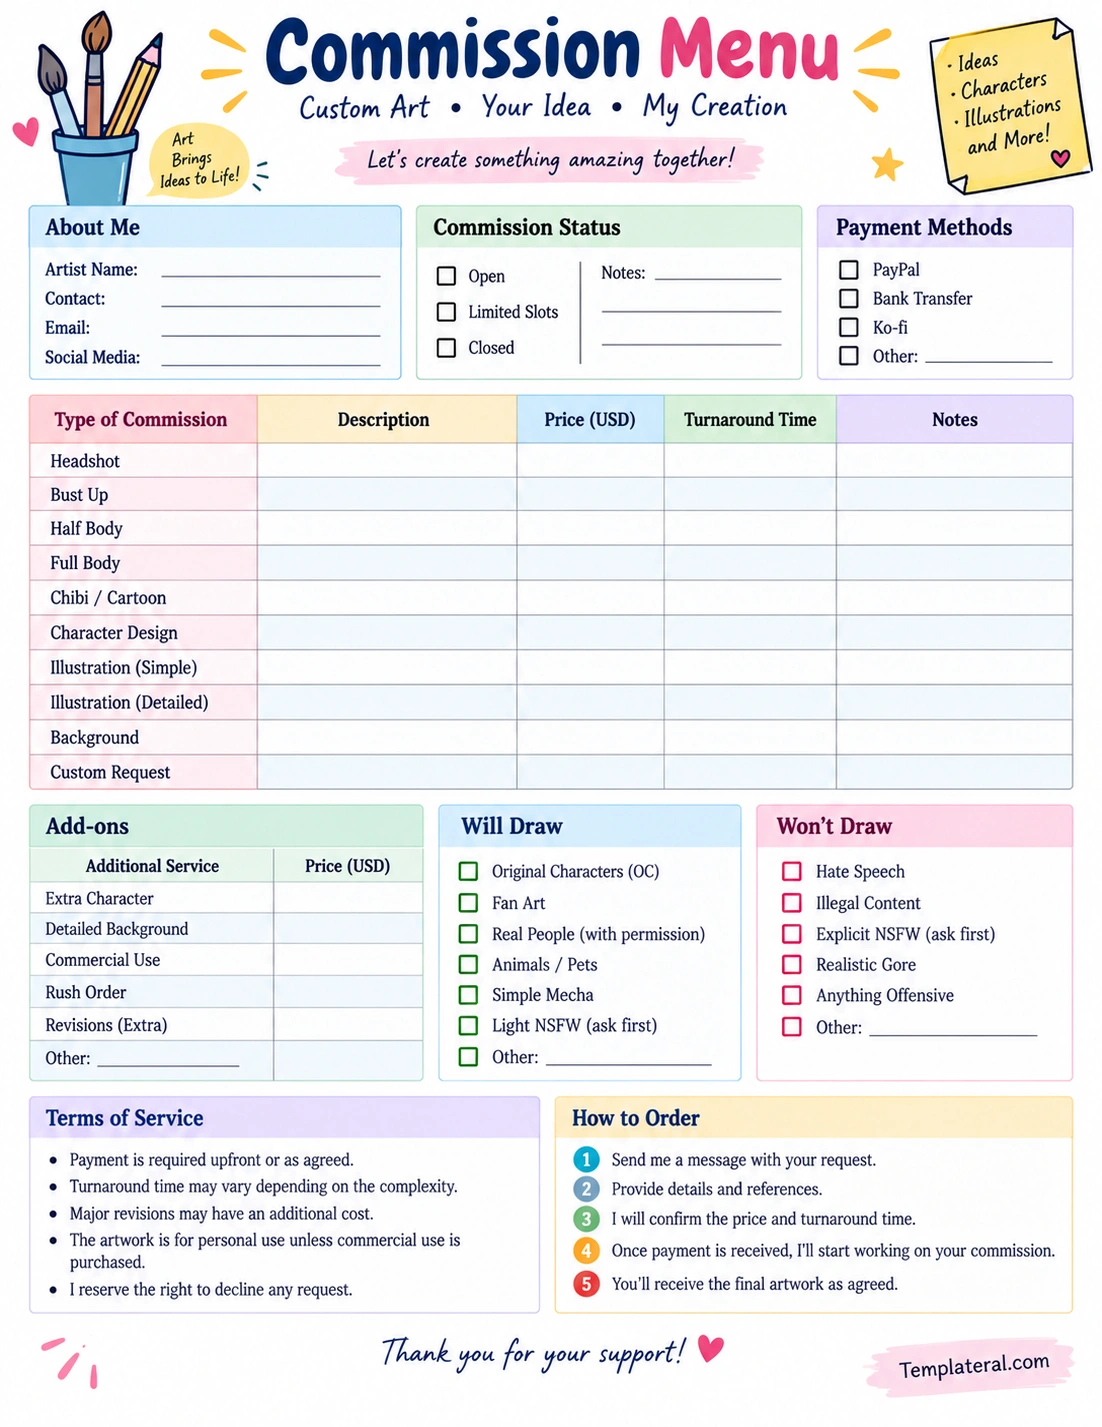
What Is a Commission Menu?
A commission menu is a structured list of custom creative services that an artist or creator offers to clients. It works similarly to a service menu by showing customers the available choices and the basic terms for ordering.
Depending on the artist’s specialty, a commission menu might include services such as:
- Portrait commissions
- Character illustrations
- Original character artwork
- Fan art
- Pet portraits
- Chibi or cartoon artwork
- Half-body illustrations
- Full-body illustrations
- Character design
- Custom backgrounds
- Commercial illustrations
- Graphic design services
The menu does not have to include every service an artist can provide. It should focus on the commission types that are currently available and easiest for clients to understand.
Why Use a Commission Menu?
A commission menu can simplify communication between artists and clients. When pricing and services are presented clearly, potential customers can review the available options before sending an inquiry.
A well-designed menu can help you:
- Save time: Reduce the need to repeatedly explain basic services and prices.
- Set expectations: Explain turnaround times, revisions, and deliverables.
- Show available options: Help clients understand different commission types.
- Present pricing clearly: Make it easier for clients to compare services.
- Reduce misunderstandings: Establish important terms before an order begins.
- Look professional: Give your commission process a consistent visual identity.
- Make ordering easier: Provide clients with a clear starting point.
What Should Be Included in a Commission Menu?
The exact contents depend on the type of creative service you provide. However, most useful commission menus contain several core sections.
Artist or Creator Information
Start with your name, artist name, brand name, or username. You can also include your preferred contact method and social media accounts.
This section makes it easy for potential clients to identify who is accepting the commissions and where they should send their requests.
Commission Types
List the types of artwork or services you offer. Keep the names simple and specific.
For example, an artist might offer:
- Headshot
- Bust
- Half body
- Full body
- Character design
- Simple illustration
- Detailed illustration
If the service has different levels of complexity, explain the difference briefly so clients understand what each option includes.
Pricing
Price information is one of the most important parts of a commission menu. You can list a fixed price, starting price, or price range depending on how your commission process works.
If your final price depends on factors such as complexity, number of characters, background detail, or commercial usage, state that clearly.
Turnaround Time
Clients often want to know how long a commission will take. Include an estimated turnaround time for each service when possible.
Instead of promising an exact delivery date before seeing the request, you can use general ranges such as several days or a few weeks. Explain that the actual timeline may vary depending on complexity and your current commission queue.
How to Create a Commission Menu
Creating a commission menu is easier when you build it around the questions clients ask most frequently.
- Step 1: List your services. Write down the commission types you currently accept.
- Step 2: Define each service. Explain briefly what is included.
- Step 3: Set your pricing structure. Decide whether you will use fixed prices, starting prices, or custom quotes.
- Step 4: Estimate turnaround times. Give realistic time ranges based on your workflow.
- Step 5: Add optional extras. List additional characters, detailed backgrounds, commercial usage, rush orders, or other add-ons.
- Step 6: Define your boundaries. Explain what types of requests you accept and decline.
- Step 7: Write your terms. Include payment, revisions, cancellation, usage, and delivery information.
- Step 8: Add ordering instructions. Tell clients exactly how to submit a request.
- Step 9: Review the design. Make sure the menu is readable and easy to scan.
How to Structure Commission Pricing
There is no single pricing model that works for every artist. Your pricing can depend on experience, skill level, complexity, demand, time required, materials, usage rights, and the type of client.
Some artists use a simple base-price system, while others create several pricing tiers.
Base Price
A base price can represent the standard version of a commission. Additional elements are then priced separately.
Tiered Pricing
Tiered pricing allows clients to choose between different levels of detail. For example, you could have simple, standard, and detailed illustration options.
Starting Prices
A starting price is useful when each commission requires a custom quote. You can show the minimum price while explaining that complex requests may cost more.
Whatever structure you choose, make sure the description explains what is included in each price.
Commission Menu Add-Ons
Add-ons allow clients to customize a standard commission. They can also make your pricing structure easier to understand because optional features are separated from the base service.
Possible add-ons include:
- Additional character
- Detailed background
- Additional props
- Commercial usage rights
- Rush delivery
- Extra revisions
- Alternative versions
- Print-ready files
- Additional file formats
Each add-on should have a clear description and price or pricing method.
Commission Menu: Will Draw and Won’t Draw
A will draw and won’t draw section can help potential clients determine whether their request is suitable before contacting you.
Will Draw
This section can list subjects or styles you are comfortable creating. Examples might include original characters, animals, fantasy characters, simple backgrounds, or specific illustration styles.
Won’t Draw
This section should clearly state categories or subjects you do not accept. The purpose is to establish boundaries and reduce unsuitable inquiries.
Keep the language straightforward and professional. You do not need to provide a lengthy explanation for every excluded category.
How to Write Commission Terms
Commission terms establish the basic rules for working with clients. Clear terms can help prevent misunderstandings later in the process.
Important topics may include:
- Payment requirements
- Accepted payment methods
- Estimated turnaround time
- Revision limits
- Cancellation policy
- Refund policy
- Personal versus commercial use
- Artist portfolio rights
- Delivery format
- Client approval process
Use language that clients can understand easily. Avoid making the terms unnecessarily complicated.
Personal Use vs. Commercial Use
One important issue to address in a commission menu is how the finished artwork may be used.
A personal commission may allow a client to use the artwork for personal purposes, such as displaying it privately or using it as a personal profile image. Commercial use can involve advertising, products, merchandise, business branding, publishing, or other activities intended to generate revenue.
If you offer commercial rights, explain whether they are included in the base price or require an additional fee. The exact rights granted should be clearly defined in your agreement or terms.
How to Make a Commission Menu Easy to Read
A commission menu should communicate information quickly. Clients should not have to read a large block of text to find the price or understand the available options.
Use a visual hierarchy that separates the major sections.
- Use clear section headings.
- Keep descriptions short.
- Use tables for prices and turnaround times.
- Separate standard services from add-ons.
- Use consistent terminology.
- Leave sufficient white space between sections.
- Make contact information easy to find.
- Use readable fonts and appropriate text sizes.
A clean layout can make even a detailed commission menu feel manageable.
Commission Menu for Social Media
Many artists share commission information through social media. In this situation, the menu needs to be easy to read on a phone or within a social media post.
Consider creating a compact version that contains the most important information:
- Commission types
- Starting prices
- Current commission status
- Turnaround estimate
- Basic terms
- How to order
- Contact information
You can direct clients to a longer terms-of-service page when more detailed information is required.
Commission Menu for a Website
A website gives you more space to provide detailed commission information. You can create a dedicated commission page containing service descriptions, pricing, examples, FAQs, and ordering instructions.
A website-based commission menu can also be updated whenever your prices, availability, or services change.
Consider organizing the page into sections such as:
- Commission overview
- Available services
- Pricing
- Portfolio examples
- Add-ons
- Turnaround times
- Terms of service
- Frequently asked questions
- How to order
- Contact information
How to Keep Your Commission Menu Updated
A commission menu should reflect your current services and availability. An outdated menu can create confusion if prices, turnaround times, or accepted commission types have changed.
Review your menu periodically and update information such as:
- Prices
- Commission availability
- Turnaround times
- Payment methods
- Services offered
- Add-on pricing
- Terms of service
- Contact information
If you temporarily stop accepting commissions, make the status obvious. A simple Open, Limited Slots, or Closed indicator can make your current availability clear.
Common Commission Menu Mistakes
A commission menu can become less effective when too much information is presented without clear organization.
Unclear Prices
Clients should be able to determine whether a listed amount is a fixed price, starting price, or estimate.
Too Much Text
Long descriptions can make the menu difficult to scan. Keep the main menu concise and provide additional details through a terms page when necessary.
Missing Turnaround Information
Even an estimated timeframe can help clients understand what to expect before ordering.
No Ordering Instructions
Tell clients what information they should provide when requesting a commission. This could include the character description, references, preferred style, deadline, and intended use.
Outdated Information
Review your menu whenever your prices, services, or commission availability changes.
Using a Blank Commission Menu Template
A blank commission menu template can provide a useful starting point for artists who do not want to design their menu from scratch.
You can customize the template with your own artist name, commission categories, prices, turnaround times, payment options, add-ons, and terms. A blank format also makes it easier to create different versions for different platforms.
For example, you could maintain one detailed version for your website and a simplified version for social media. The information can remain consistent while the layout changes to fit each platform.
Tips for Creating a Professional Commission Menu
- Be specific: Explain exactly what each commission option includes.
- Be transparent: Clearly identify starting prices, additional charges, and optional services.
- Set realistic timelines: Give clients an honest estimate rather than an overly ambitious deadline.
- Use consistent formatting: Keep headings, prices, and descriptions visually organized.
- Define your boundaries: State what types of commissions you accept and do not accept.
- Make ordering simple: Give clients clear instructions for starting a commission.
- Update regularly: Make sure the published menu reflects your current availability and terms.
- Keep a detailed terms page: Use your main menu for quick information and a separate document for lengthy policies.
Conclusion
A commission menu is more than a list of prices. It is a practical communication tool that helps artists explain their services, establish expectations, and guide clients through the ordering process.
A useful commission menu can include commission types, pricing, turnaround times, add-ons, payment methods, accepted and excluded requests, terms of service, and ordering instructions. The key is to present the information clearly without overwhelming the reader.
Whether you share your menu on a website, social media, messaging platform, or as a printable document, a clean and organized format can make the commission process easier for both the artist and the client. A customizable commission menu template provides a convenient starting point for creating a professional reference that can be updated as your creative business grows.
Download: Commission Menu Template
